Published on: 2024-03-25 (updated on: 2024-11-29). 🔗 Permalink
Certificate request process
This article demonstrates how to request a certificate via the Deutsche Forschungsnetz (DFN).
Current situation with GÉANT and Sectigo (updated on 2024-12-16)
The DFN has announced that Sectigo has terminated its contractual relationship with the GÉANT consortium due to differences.
On December 13, 2024, DFN announced that a new contractual relationship has been established with the Greek provider HARICA as a transitional solution. More information can be found regularly updated on the DFN pages regarding the current situation and on the services offered by HARICA in particular. We will, of course, accept HARICA certificates for authentication as soon as more information is available.
It is no longer possible to request certificates through Sectigo.
The security of access to our services is not at any time compromised by this changeover. We will inform about further steps through the channels of the coordination office and on this website.
Access protection using mTLS
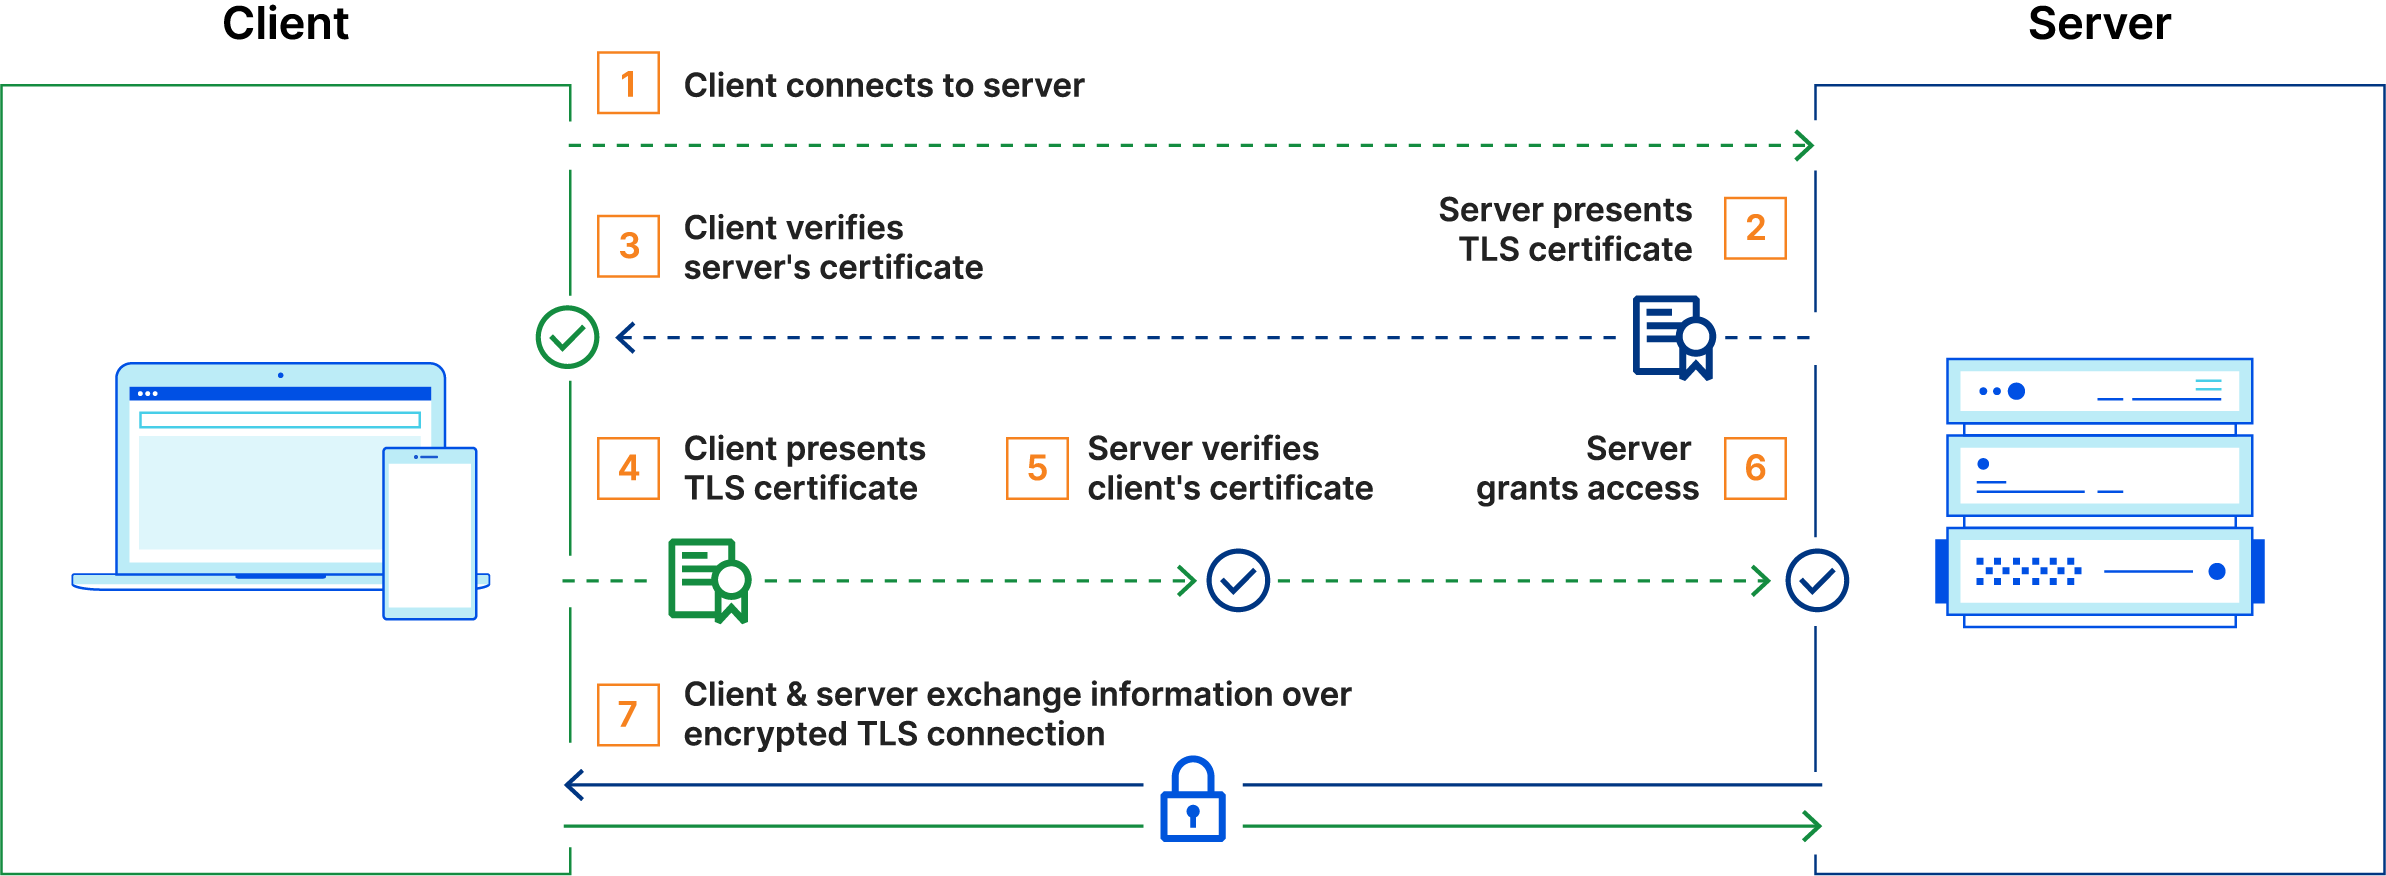
The instance of Ontoserver that is hosted through the SU-TermServ is protected using Mutual TLS. This means that with every access to the endpoint, a mutual certificate exchange takes place, so you need to set up a corresponding certificate on your side and present it with every connection establishment:
Certificate Infrastructure within DFN
The majority of tertiary educational institutions in Germany, including universities and colleges, as well as German university clinics, are partners in the German Research Network (Deutsches Forschungsnetz e.V. or DFN). In addition to a high-performance fiber infrastructure connecting these institutions to the internet, DFN operates a Public Key Infrastructure (PKI) for issuing certificates, called the DFN-PKI 🇩🇪. These certificates can be used for securing websites, email communication, VPN connections, and user authentication. In the past, these certificates were issued independently by DFN institutions and were anchored by a root certificate from Deutsche Telekom. Since 2021, this PKI has gradually been replaced by a service called Trusted Certificate Services (TCS), offered by the pan-European organization GÉANT and operated by Sectigo. All server certificates from the old DFN-PKI have now expired, while personal certificates issued with a validity of 3 years may still be valid for a few more months. New certificates are exclusively issued from the new PKI. Old certificates cannot be renewed; however, our services will continue to accept them if they have not yet expired.
The old DFN-PKI was locally managed by the respective data centers. DFN provided a web console and an Intermediate Certification Authority (Intermediate-CA). However, within TCS (Trusted Certificate Services), self-service is now offered. DFN participant data centers must provide an authentication and authorization solution that allows users to federatedly log in to the Sectigo console (please refer to the DFN help pages 🇩🇪). Once users have logged in via the relevant entry points provided by the partner institution, they can obtain personal certificates and server certificates. It’s important to differentiate how the identity of the entity being certified is ensured:
- For personal certificates, this is ensured through the authentication of the individual by their home institution (i.e., for employees and students upon hiring or enrollment, verified by presenting an official ID).
- For server certificates, the server’s identity is ensured through logging in to the Sectigo console and confirming domain ownership. This is achieved through the mechanism of Domain Control Validation. Each DFN partner institution can issue certificates only for domains associated with them. For example, if the University of Example City has the domain
uni-examplecity.de, it can issue certificates forwww.uni-examplecity.de,mail.uni-examplecity.de,server1.vpn.uni-examplecity.de, and so on. The validation of the corresponding top-level domains is the responsibility of the respective local data center.
Requesting a Certificate
In general, all processes related to issuing a certificate occur within the web console of the external provider Sectigo. Besides GÉANT TCS, Sectigo also operates other commercial certification services. Therefore, entry into the console is facilitated through specific web links that identify the customer (DFN e.V.) to Sectigo. Due to technical reasons, there may be variations in the links mentioned below. Please refer to the relevant help pages provided by your local institution.
General instructions
In this help article, the basic certificate application process is described using the example of the University of Lübeck. All statements and the process were correct for the certificate application process within the University of Lübeck network at the time of writing this article on March 25, 2024. Please independently verify whether your organization’s data center provides different instructions for requesting a certificate.
Additionally, the SU-TermServ cannot and will not provide assistance for obtaining an appropriate certificate. In case of issues, please contact your data center directly!
Personal Certificates
Personal certificates can generally be requested for employees and students. To do so, log in to the Sectigo console. After successful authentication, you can apply for a certificate. The individual’s identity is verified by their home institution. These certificates have a validity of 3 years.
As a rule, you can access the relevant console via the link https://cert-manager.com/customer/DFN/idp/clientgeant. However, there may be different links specific to your institution.
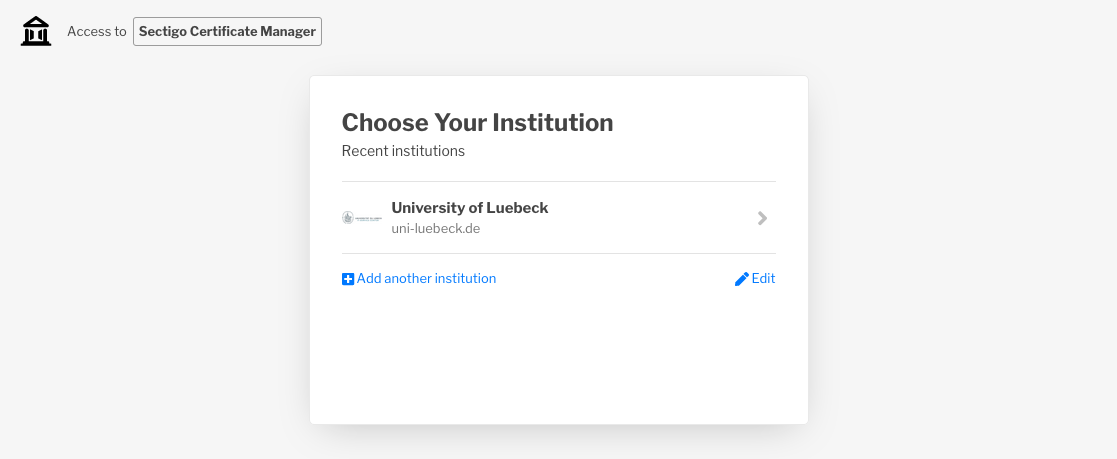
Now, log in using your institution’s Identity Provider (IdP):
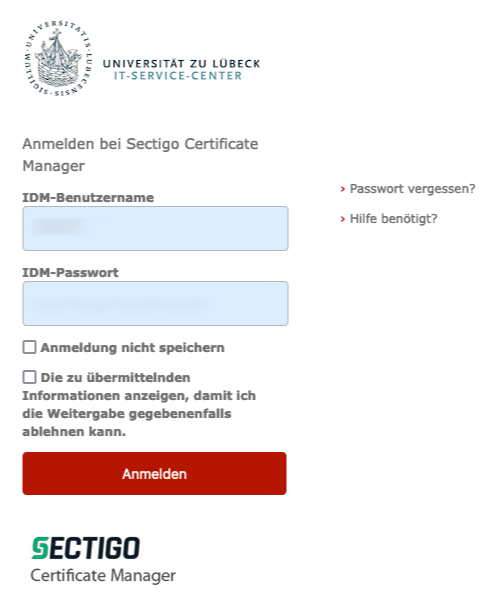
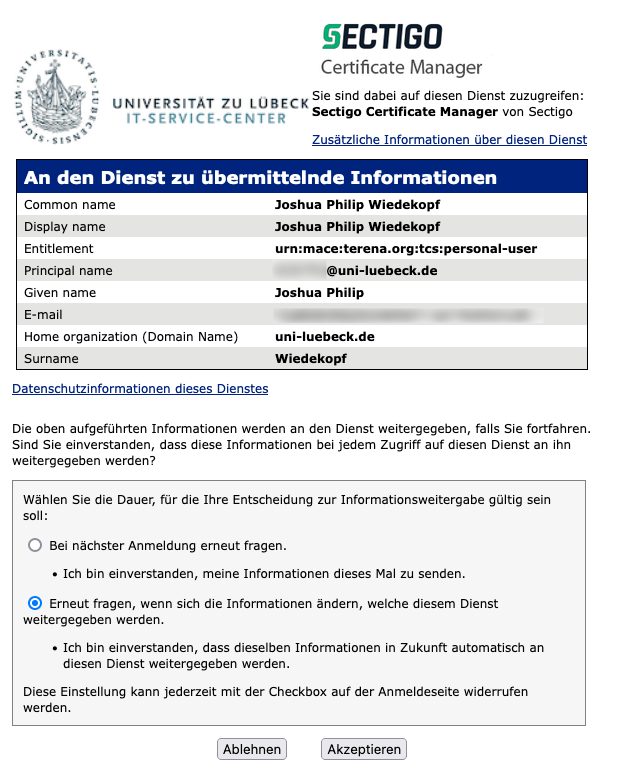
Depending on the configuration of your IdP it might be possible that you have to confirm the transmission of your personal information:
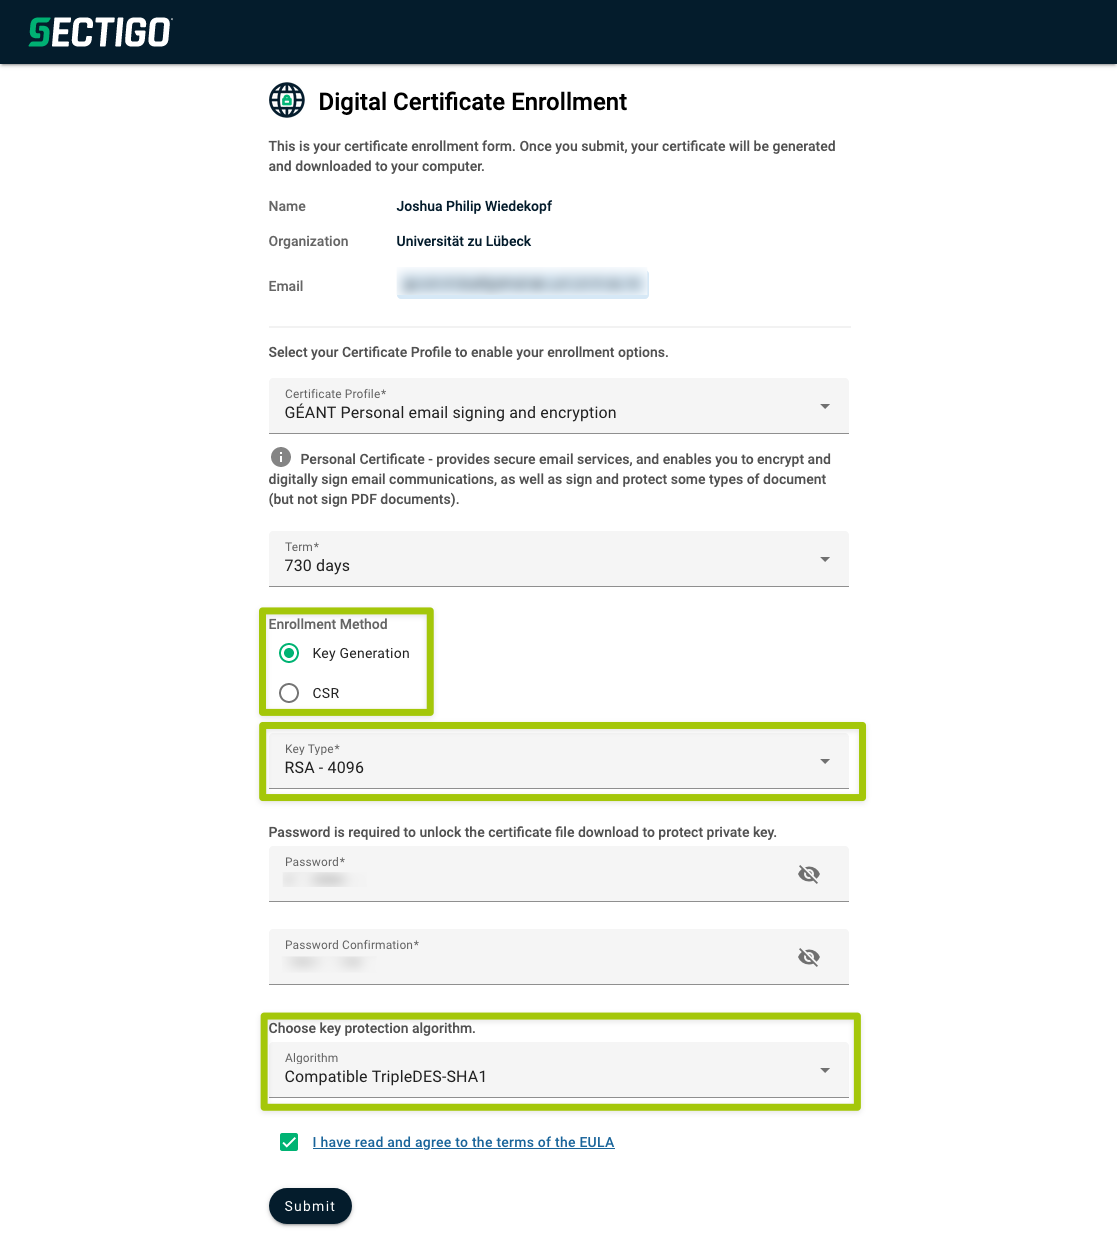
After logging in, you can now apply for your certificate by completing the application step by step:
Important settings
- If you are offered a validity period of 730 days, you should choose it.
- For the Enrollment Method, select Key Generation unless your institution instructs you to generate your own key and upload a Certificate Signing Request (CSR). Using a CSR is still possible but requires expertise in handling certificates. With Key Generation, the key is directly generated in your browser and transmitted to Sectigo.
- Important: Choose
RSAwith a minimum of 2048 bits (4096 bits are recommended) as the Key Type. The use of Elliptic Curve (EC) keys can cause issues in connecting to the Ontoserver; currently, only RSA is fully supported. - Important: Select
Compatible TripleDES-SHA1as the Key protection algorithm, as modern algorithms can cause significant problems with operating systems and Java. Alternatively, you can chooseSecure AES256-SHA256, but you may need to convert the key pair to the compatible format. This conversion can be done using OpenSSL; the process is described in this StackOverflow answer.
After a short waiting period, the certificate will be provided in PKCS-12 format with the file extension .p12. This certificate can be imported into most operating systems and applications. For usage in browsers, please refer to this FAQ entry. The setup within Ontoserver for syndication (where the use of a server certificate is recommended) is described in the FAQ entry Setting Up Syndication (-Certificate).
Server certificates
For requesting a server certificate, a general manual can not be provided, but only the example of a certificate application at the University of Lübeck can be shown (the manual can be found here, but is only valid for the University of Lübeck).
In some cases, your data center may not yet allow self-service application of server certificates in the Sectigo console. In this case, please contact your data center to clarify the application process!
To apply for a server certificate, familiarity with command-line usage and an up-to-date installation of OpenSSL are required. An alternative approach is to use the graphical tool Keystore Explorer (KSE), which is also described here. KSE is recommended if you do not intend to use the certificate for HTTPS encryption via a reverse proxy but only for authentication purposes or direct HTTPS implementation within your Ontoserver. However, exporting the key pair in PEM format from KSE is also possible.
The application process involves several steps:
- Generating a Key Pair
- Creating a Certificate Signing Request (CSR)
- Submitting the CSR to Sectigo
- Domain Ownership Validation (performed by your data center)
- Receiving the Certificate from Sectigo
Certificates for non-existent domains
In principle, certificates can also be issued for non-existent servers. Your data center has already verified your top-level domain (e.g. uni-beispielstadt.de) via Domain Verification, and your request for test.uni-beispielstadt.de will then be processed via the RZ team. Your RZ might only accept requests for existing domains, you might need to talk to them about your specific needs if you desire a certificate for a domain that doesn’t exist. We of course don’t verify the reachability of the requesting server.
CSR Creation using OpenSSL
To generate a server certificate, follow these steps using OpenSSL:
openssl genrsa -out su-termserv-test.imi.uni-luebeck.de.key 4096
Next, create the certificate signing request:
openssl req -sha256 -key su-termserv-test.imi.uni-luebeck.de.key -new -out su-termserv-test.imi.uni-luebeck.de_csr.pem
Dabei wird Sie OpenSSL nach einigen Eingaben fragen, die durch Ihre Institution vorgegeben werden. Für die Universität zu Lübeck sieht dies mit den Eingaben so aus:
You are about to be asked to enter information that will be incorporated
into your certificate request.
What you are about to enter is what is called a Distinguished Name or a DN.
There are quite a few fields but you can leave some blank
For some fields there will be a default value,
If you enter '.', the field will be left blank.
-----
Country Name (2 letter code) [AU]:DE
State or Province Name (full name) [Some-State]:Schleswig-Holstein
Locality Name (eg, city) []:Luebeck
Organization Name (eg, company) [Internet Widgits Pty Ltd]:Universitaet zu Luebeck
Organizational Unit Name (eg, section) []:
Common Name (e.g. server FQDN or YOUR name) []:su-termserv-test.imi.uni-luebeck.de
Email Address []:[email protected]

Please enter the following 'extra' attributes
to be sent with your certificate request
A challenge password []:
An optional company name []:
Attributes *not* to use
The attributes Challenge password and Company name should generally not be used. The attribute Organizational Unit Name is not used by Sectigo anymore and can be left blank.
If you require additional Subject Alternate Names (SANs), you can specify these settings in a file and pass them to OpenSSL using the -config option. For detailed instructions, please refer to the documentation provided by your data center and OpenSSL’s documentation.
CSR Creation using Keystore Explorer
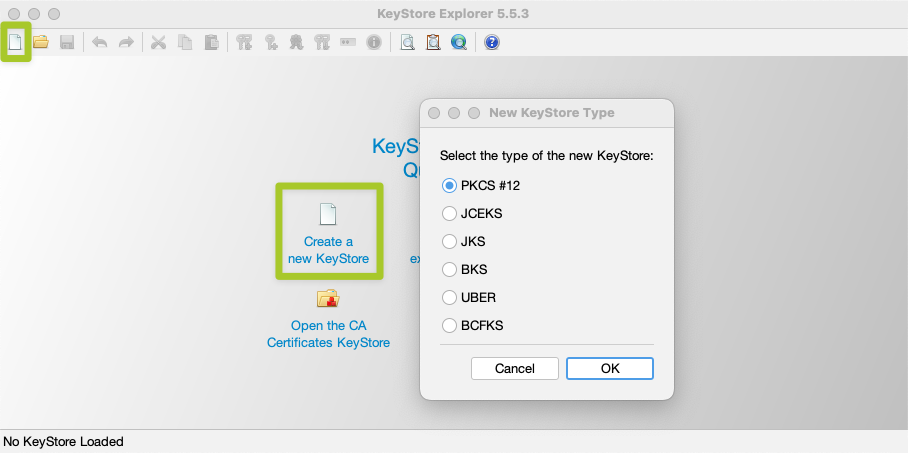
You can also perform the necessary steps using Keystore Explorer. After launching the program, select “Create New Key Store”. In the following dialog, choose “PKCS#12” as the type of the new key store:
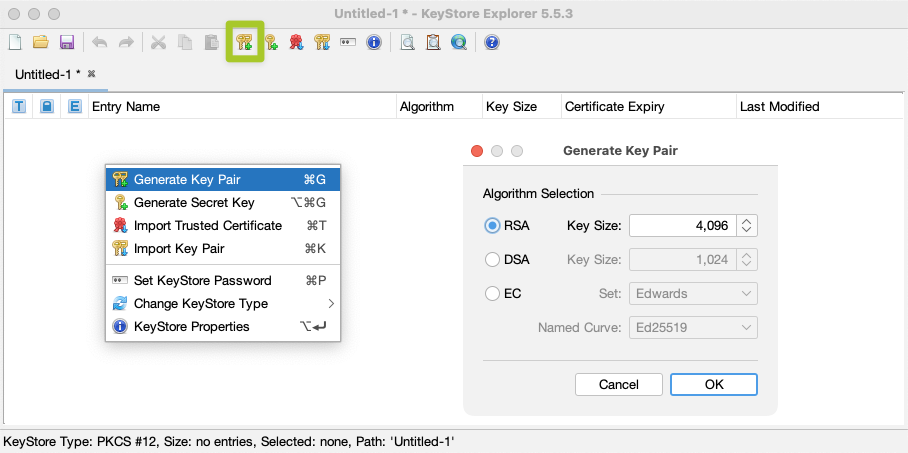
Next, select “Create keypair” and choose RSA with 4096 bits:
Next, select Version 1 and enter the Distinguished Name (DN) of the certificate to be issued using the structured form:
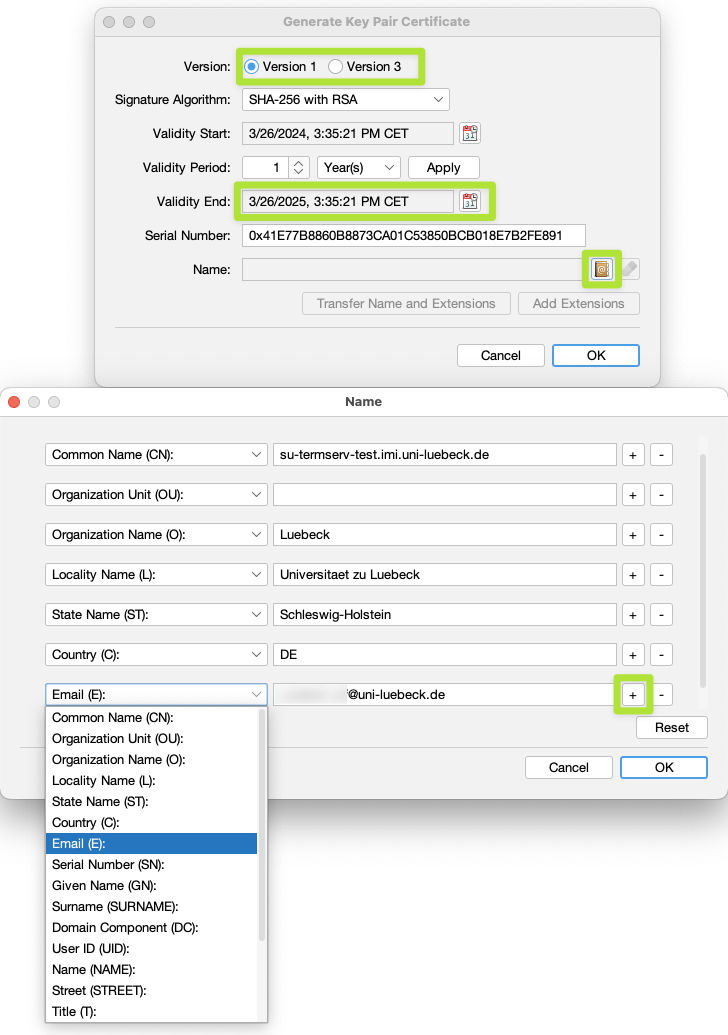
You will also need to provide an e-mail address under which you can be reached. Thus, click on the + in the DN dialog, then select Email (E). The e-mail is required to be able to receive the certificate from Sectigo.
The validation period is chosen to be one year by default, which is correct. After confirming, you will be asked to enter an alias name, which is pre-filled with the CN from the certificate name. This can be accepted as is.
Lastly, you need to assign a password to protect the private key. This password can be freely chosen. Subsequently, the new certificate entry will appear in the list. Save the keystore by clicking “Save”. You will also be asked to assign a password for the keystore, which should be pragmatically identical to the password for the key pair!
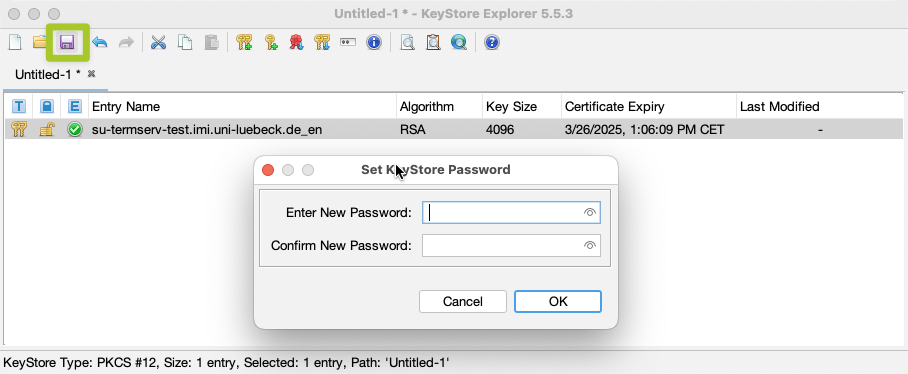
Afterwards, you will also need to create a Certificate Signing Request (CSR). To do this, select the key pair entry and click “Create Certificate Request”. The default settings should already be correct:
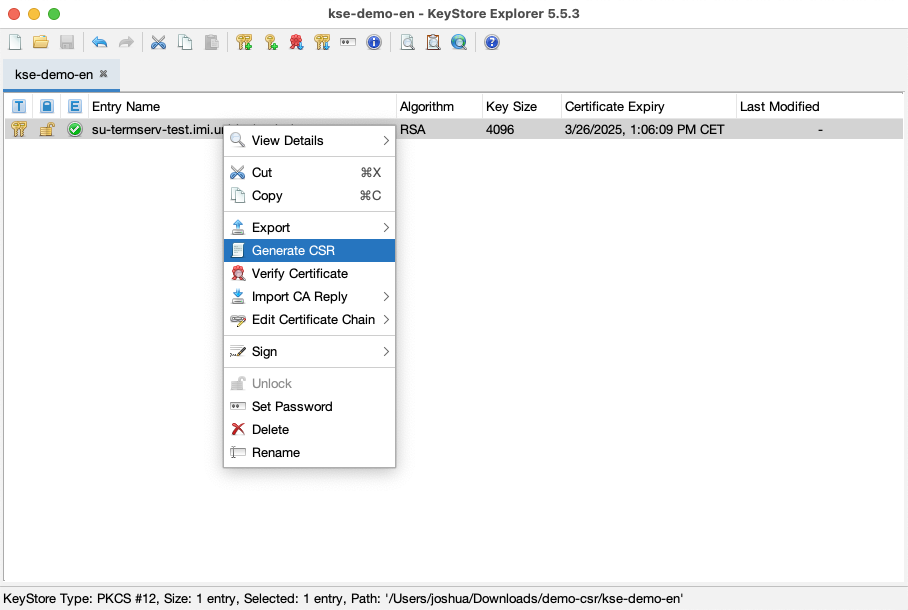
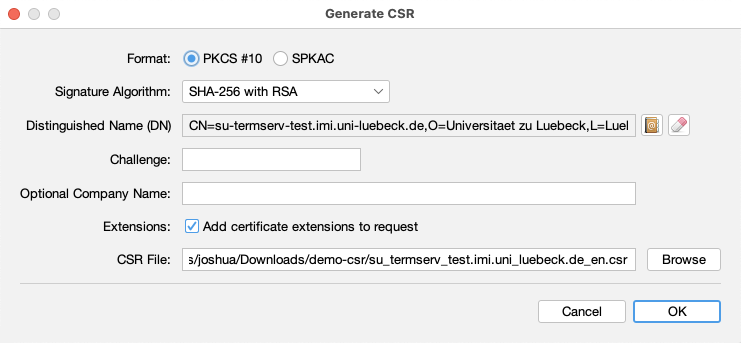
By using the default settings, the CSR will be created in the same folder as your keystore.
Ordering the certificate
AFter you have created your CSR, you can now submit it via the Sectigo console. After your data center has successfully validated the domain ownership, the certificate will be issued by Sectigo and provided to you.
Log in to the console following the instructions of your data center.
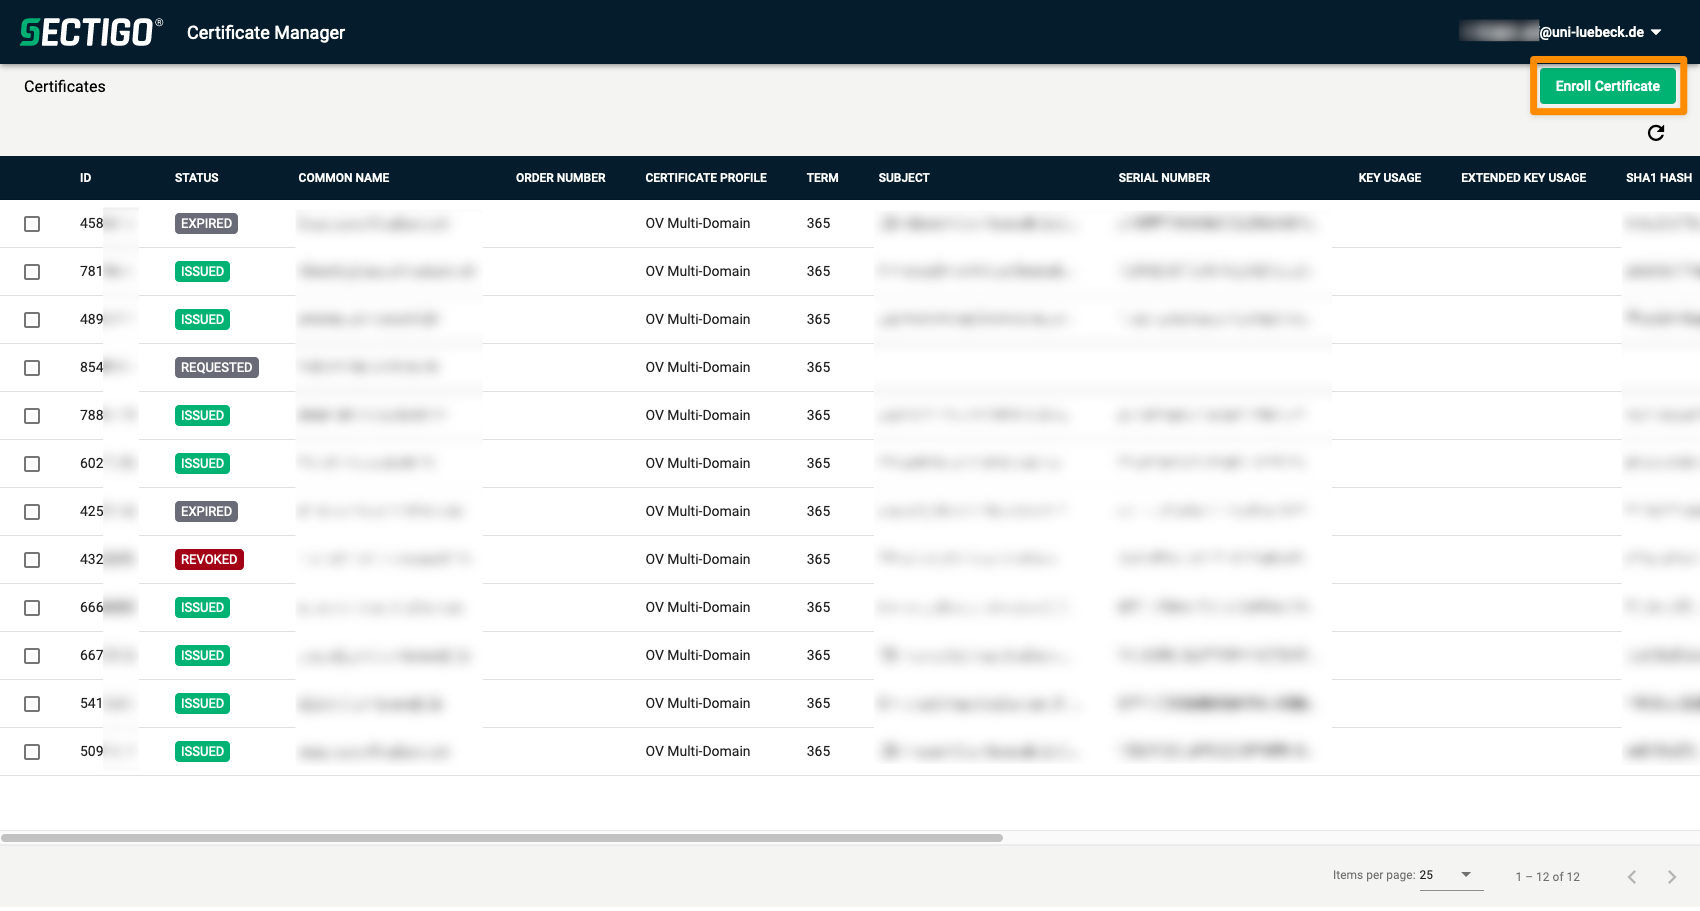
Now, upload the CSR in the “Enroll Certificate” window. In the case of the University of Lübeck, you cannot select certificate profile and term, this might look different for you. The fields “External Requesters” and “Auto Renew” are particularly interesting. With External Requesters, you can specify additional email addresses that should be informed about the status of the request and receive notifications about the expiration.
Additionally, by using “Auto Renew”, you can already request the renewal of the certificate in advance, so that the request is automatically submitted with a selected lead time, allowing you to plan the necessary server maintenance in time.

After submitting the request, you will receive a notification to the email address specified in the CSR and all other addresses listed under External Requests that the certificate is under review. Your data center must review and approve the request, after which the certificate will be issued by Sectigo. You will also receive the certificate via email. For using the certificate to connect to the SU-TermServ, the further setup is described in the FAQ Setting up Syndication (-Certificate).
Creating a P12 bundle using OpenSSL
After receiving the certificate from Sectigo, you will need to create a P12 bundle that contains the certificate and the private key. In the e-mail received from Sectigo, choose the link after as Certificate (w/chain), PEM encoded and download the file (here: su-termserv-test.imi.uni-luebeck.de.cert).
Next, you can use OpenSSL to create the P12 bundle, which is consumable by Ontoserver:
openssl pkcs12 -export -legacy -inkey su-termserv-test.imi.uni-luebeck.de.key -in su-termserv-test.imi.uni-luebeck.de.cert -name su-termserv-test.imi.uni-luebeck.de -out su-termserv-test.imi.uni-luebeck.de.p12
As mentioned above, the -legacy switch is important to maintain compatibility with operating systems and Java alike. The password you choose here will be required when importing the certificate into Ontoserver.
